Marauder
Pistol EVP |Benjamin
Discovery EVP
NEW!!
Projects "BLOG" Current projects and prototyping discussions
Crosman Pistol PCP Conversion Tutorial - (Email for link to tutorial)
NEW!!! TKO Productions! Crosman 2240 Teardown Videos on Youtube.com
Part
1 (Teardown) 10:00: http://www.youtube.com/watch?v=pTHChcW9ktI
Part
2 (Assembly) 10:00: http://www.youtube.com/watch?v=QuGSaO_B_gU
Part 3 (Assembly) 4:00: http://www.youtube.com/watch?v=Wp245fjsCus
(Not
sure why the volume is so loud....)
This
page will always be under construction!
Because
I actually shoot each gun for accuracy (18 yards) and velocity (Chrony)
when one comes in for a tune, I can plot to what effect each modification
has on the overall performance of your airgun.
Here
is what I have found:
For accuracy
#1.
Fix the barrel band. Probably the easiest way to maintain accuracy
from session to session.
The barrel band has 2 set screws that are, in effect, squeezing
the barrel and airtube together. Since the band is "split"
at the juncture, the band spreads apart as the set-screws are tightened.
The tighter they are, the more the barrel is pinched towards the
airtube. You can see this effect if you sight down the barrel and
look at the space above the barrel and below the airtube. (You probaby
won't be able to see the gap under the airtube unless the action
is out of the stock. You will also see this on all current Crosman
guns that use the barrel band.)
This squeezing causes two problems:
#1: The barrel is being tensioned downward. If you
slip the barrel band off the action, you will notice that the barrel
is actually angling upward, away from the airtube. That is because
the design of the Crosman breech port seal and the tiny forward
breech screw act as a pivot point while the rear action screw is
of a much more stout construction and acts as the lever.
#2: The Discovery is a great gun, but a little loud. The addition
of a muzzle brake makes the gun more pleasant to shoot at home,
etc. The smaller .75" brakes I and others make allow the filling
of the gun while installed, but that downward angling barrel can
cause it to be a very tight fit for the fill adapter. Hence setting
up the gun with a parallel barrel helps while filling the gun.
We can see that clamping the barrel parallel to the airtube is the
desired effect, but the design of the band doesn't allow that if
the screws are tightened securely.
 Shimming
the barrel band… Shimming
the barrel band…
The quick and dirty solution (and one that works quite well), it
to cut two (or more depending on the amount of distortion our band
has) 1/2" X 1/2" pieces from a soda can. Form one piece
to the curvature of the diameter of the barrel, and the other to
the curvature of the diameter of the airtube. With the barrel band
set screws loose, slip the 1st piece UNDER the barrel, between the
barrel and the barrel band, and the other piece OVER the airtube
between the airtube and the barrel band. Then tighten the set screws.
Since the barrel band is "split", overtightening the set-screws
will cause the same tensioning problems.
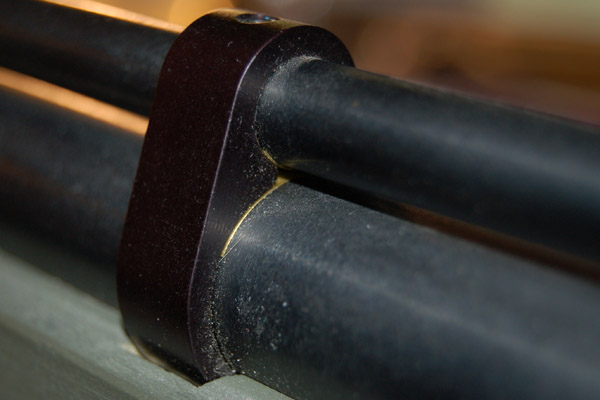
 Drilling
for additional barrel set-screws… Drilling
for additional barrel set-screws…
A bit tougher but much better method to adjust the barrel is to
drill the barrel band and install additional set-screws.
This makes a "3-point" cradle for both the barrel and
airtube and offers a much better and sturdier attachment. This is
the method I use when I build a gun based on the Discovery and am
looking for ultimate accuracy with the factory barrel. Here's a
picture of one that has been drilled with set-screws added. Two
holes angle upward and two holes angle downward. I used 6-32 set
screws and sightly grind the points off the screws to avoid scarring
up the airtube. I don't want to cause any gouges where a stress
crack may develop. (Cranking down on the factory set-screws will
already have scarred up the airtube.)
It's tricky to drill the flat at an angle. I use an end mill and
do a litte side cut flat then drill with a #36 bit. You can do it
in a drill press. Make a small dimple at the desired points, then
angle the band and drill your angle.
#2: Smooth the leade-in ("chamber")to
the barrel. We are trying to achieve a nice, smooth transition
of the pellet into the rifling of the barrel.
I have not found any difference in accuracy from a
barrel that has a very long angle to the rifling compared to one
that has a sharper transition, but fine accuracy from a crosman
barrel always requires that the pellet head be seated in the rifling
to eliminate any yaw being intorduced to the centerline of the pellet
compared to the bore of the barrel.
I use a tool I made that has a collar depth gauge
to prevent cutting the leade too deep. While the barrel is in the
lathe, I take off about 001 from the face of the breech end of the
barrel for a tighter lockup of the bolt handle.
 #3:
Recrown the barrel. I have factory crowning on barrels
from Crosan that were far far off center. Not all crowning is bad
from the factory, but I would say 85% of the barrels can be improved. #3:
Recrown the barrel. I have factory crowning on barrels
from Crosan that were far far off center. Not all crowning is bad
from the factory, but I would say 85% of the barrels can be improved.
I cut the barrel flat, then cut a 11 degree inset,
and lap with a brass lap and 1500 grit wet-dry sandpaper soaked
in thread cutting oil. I run the lap both clockwise and counterclockwise
7-8 times, always ending with the barrel spinning clockwise (reverse
from usual lathe turning direction.) A cotton swap in the muzzle
pulled out slowly tests for burrs.
#4 Lap the barrel. I concentrate
on lapping the first 2/3rds of the barrel, with a quick final lap
of the entire length. I'm trying to keep the barrel from scouring
any lead from the fine pellet skirt.
More to come!!! |
